|
Nintendo Hacks
| |
How to make your own Nintendo GameCube (and Wii) SD adapter
Introduction
I do not take any responsibility on what you do.
If your GameCube,
Wii or anything else gets damaged in any way you yourself
are responsible!
Now that I've been looking into GameCube homebrew I've noticed that
running homebrew can be done via pretty much three ways. One of these ways is
using a SD adapter that fit's in the memory card slot of the Nintendo
GameCube. Because I didn't want to spend a lot of money (and like toying
around with electronics) I figured I might as well make my own ;).
.jpg)
The Nintendo GameCube memory card is a modified SD card. Making
adjustments to it to create a SD adapter not very hard but the way I do it
here means you will no longer be able to use the memory card to save your
games to. It is possible to retain the save functionality but I don't know how
exactly and I haven't done this myself. Therefore be prepared to sacrifice a
memory card if you follow my guide.
To start this guide off I would
first like to say that the right tools for the job can make your life a hell
of a lot easier. Get a proper soldering iron, proper wire and a proper memory
card. Also proper tongs and etc. can be very useful.
The guide
Now what you'll need:
- A GameCube memory card; you don't need an official one, I suggest you
get one that has room inside for a SD socket.
- A good soldering iron with a nice small tip (or whatever you think will
get the job done). This is what
I used.
- A SD socket (I'll get to that later).
- Cables to connect the socket to the pins from the salvaged memory card.
- Slight soldering skills (not heavily needed but I highly suggest basic
experience and knowledge of soldering and electronics).
Memory
card: You don't need a GameCube memory card but I do suggest you buy one.
You can of course make your own casing and pins but it will be much easier to
just salvage an old one.
A good soldering iron: Like I said good
tools make the difference between a pleasant build and a hell on
earth.
A SD socket: Now this is the important part. Any SD
socket will do as long as it will fit your memory card (whatever position you
mount it). Personally I received samples from Molex.com. Namely the 47265-0001. I will continue as if you have this product and
will be mounting it in the same way I did. I will however try and explain
things in a general way so any adapter will do.
Cables to connect
the socket to the pins on the GameCube side: What are proper cables? Any
cable will do most probably. Just make sure the ones you will be using will
fit into your donor casing. About 7 wires will run through the casing and they
will sometimes cross each other. As long as they are thin enough to allow for
that you'll be fine.
Step one: Making room
The first thing you need to do is
open the memory card and make room in the housing for the SD socket.
Personally I wanted to mount my socket so it became side loading. You can of
course choose front loading if you like that better. To make room I had to
file away a part of the bottom, a small line on the top and one of the screw
holes on the top part of the memory card.
.jpg) .jpg)
Then modify the PCB of the memory card (possibly you can leave large
parts attached, but to be safe I simply took off everything not needed making
sure all lines were unconnected). I did however try to keep enough of the PCB
so I could easily glue it to the bottom of the housing.
.jpg) .jpg)
Pin outs
The pin outs are actually very simple. As the
Nintendo GameCube memory card is a modified SD card you can directly connect
the SD socket to the GameCube.
.jpg) .jpg)
This should be enough for you to make your own SD adapter as it's a
simple task of connecting the right pins. To make it easier for you I've made
a table containing the pin name, SD pin number, the GameCube memory card pin
number and the pin number of the Molex SD socket (those values only apply on
the specific socket I used!).
| SD socket, SD card
& GameCube memory card Pin layout |
| Name/Use |
Pin SD
card |
Pin SD socket
(specific) |
Pin GameCube
memory card |
| CD/DAT3 |
1 |
11 |
9 |
| DI |
2 |
12 |
5 |
| VSS (earth) |
3 |
13 |
2 or 10 |
| VDD (current) |
4 |
14 |
4 |
| Clock |
5 |
15 |
11 |
| VSS2 (earth*) |
6 |
16 |
2 or 10 |
| Connector Data Line
0 |
7 |
17 |
7 |
Assembly itself is fairly strait forward, but for those with only
limited knowledge of electronics I'll explain the process.
Assembly
The first thing I did was remove all
unnecessary pins from my SD socket to make sure I didn't connect anything that
shouldn't be connected. As I stated earlier I've used a SD socket provided by
Molex, the
47265-0001. This socket is capable of mating with more then just SD cards.
The pins I removed where 10, 9, 8, 7, 6, 5, 4, 3, 2 and 1. If you look at the
socket you can see that those are the pins that are mounted "lower" (once you
get your hands on one you'll understand ;)).
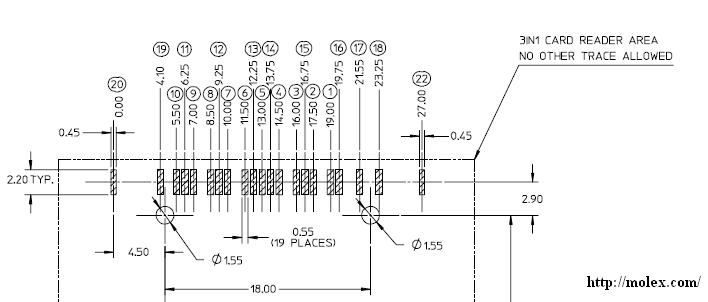
Image taken from the
official PDF document made by Molex, see their website for copyright details.
This is how it looked before (left) and after (right. I hope you can
see what I mean and what pins I removed):
.jpg) .jpg)
Because I wanted to mount the socket sideways the length and
positioning of the cables to connect the salvaged bit from the memory card to
the socket became very important. For every cable I checked the length to both
connection points (the socket and the memory card) and how I could position it
so that all cables would fit. Changing their size once you've soldered them
can be tricky so you should really try to get their size right the first
time.
Once you get the cables done you should have all parts needed for
your SD adapter. Now on with the real assembly :D! Personally I suggest you
first solder the cables you just made to the SD socket. You can do it the
other way round and solder them to the salvaged memory card pins first if you
like but that could make it quite hard when you want to solder them to the SD
socket. Your housing will probably get in the way. But prove me wrong if you
must :).
Now you will need to connect the pins as stated in the pin out
section (when you are soldering print both the pin images and the table or
keep them on screen). It is not needed to connect two ground pins on the
GameCube side but I think it is needed on the SD socket side. To give you a
clue on how it can look in the end here is mine (which is a pretty bad
soldering job really...):
.jpg) .jpg)
Please note: This image does not show a completed SD adapter. One
still needs to connect both sense lines on the Nintendo GameCube side. As I
can understand you don't know exactly which pins you need to connect (and
which aren't needed) I've written down which pins need to be connected (and
numbered them so you know how much wires you'll have to make). If you have the
same SD socket as I have you can use the pin layout I have provided. If not
check your own socket and make a table similar as this one:
| What pins connect
to what pins? |
| Wire number and
color* |
Name/Use |
Pin SD socket
(specific) |
Pin GameCube
memory card |
Pin GameCube
memory card |
| 1. Green |
CD/DAT3 |
11 |
9 |
- |
| 2. Pink |
DI |
12 |
5 |
- |
| 3. Red/White |
VSS (earth**) |
13 |
2 or 10 |
- |
| 4. Yellow |
VDD (current) |
14 |
4 |
- |
| 5. Gray |
Clock |
15 |
11 |
- |
| 6. Red/White |
VSS2 (earth**) |
16 |
2 or 10 |
- |
| 7. Black |
Connector Data Line
0 |
17 |
7 |
- |
| 8. Black*** |
Sense; GameCube side
only |
- |
1 |
12 |
*.: This is only the color I used you are of course
free to use any color you like (I do suggest using different colours for every
connection though).
**.: On my images you can see a long white wire, a
short white one and a long red one. This is because when I connected VSS (red)
I noticed the salvaged memory card I was using was no longer grounded as I had
removed too much of the PCB. To fix this I placed a white wire to the small
metal plate (also ground) and connected that to VSS on my SD socket. To ground
VSS2 on my SD socket (I believe it HAS TO BE grounded) I placed the small
white wire from VSS to VSS2.
***.: Both sense pins have to be connected or
else your adapter will not get detected (this has not yet been done in the
pictures of my adapter)!
On a side note: As you can see I've
pressed down on the cables to make them flatter. This had to be done so it
would fit inside the GameCube's memory slot. I did this by simply getting a
pair of tongs and push down on the wires. Also try to solder as flat as
possible, if the connections are too high your memory card will no longer fit
in the GameCube's memory slot (maybe you can make the salvaged PCB thinner by
filing of a small layer, but I haven't done this myself so I can't guarantee
anything).
Once you have succesfully connected all the soldering it's
time to finalize your adapter. If the connector side is able to move you'll
have to glue it into place. Once done close up your housing and test out your
newly homemade GameCube SD adapter!
*Addition - updated*
I've recently found a SnesGX build that works for me (with all
my SD cards) and which can be used to test your SD adapter. You can download
it here.
After some tests I also found that pretty much all new homebrew that uses the
SDadapter works for me, but only with one of my SD cards. Apparently it really
matters what SD card you use, but I'm unsure why one works and the others
don't.
Also, I've received a nice set of pictures of a completed SD
adapter from shtonkalot. You can download the images here.
Thanks for sending the images mate, this makes it a lot easier for people to
make their own adapter!
And here I have a second set of pictures from
someone who made his own adapter. In this case the SD socket wasn't even
removed from the cardreader it was taken from! To allow for easier handeling a
network plug was used to make the socket removable. See for yourself here.
Thanks Derek!
I hope you now have a nice GameCube SD adapter ;).
Remember though, this guide isn't perfect (it is possible to retain the normal
save function of your memory card if you know how. I don't so I did not
incorporate this into my guide).
Guide By: -Simon "Scorpei" van de Berg
|
| |
|
|
|
| |
.jpg)
.jpg)
.jpg)
.jpg)
.jpg)


.jpg)
.jpg)
.jpg)
.jpg)